Showing posts with label Zigbee. Show all posts

Tuesday, July 26, 2022

How to build EmberZnet 7.1.0.0 Z3Gateway on Raspberry Pi.

 The following steps show you how to build EmberZnet 7.1.0.0 Z3Gateway on Raspberry Pi.


1. Install Simplicity Studio v5 and GSDK 4.1.0 on Ubuntu 20.04LTS. For example, GSDK 4.1.0 is installed at "~/SimplicityStudio/SDKs/gecko_sdk_2" in my test.

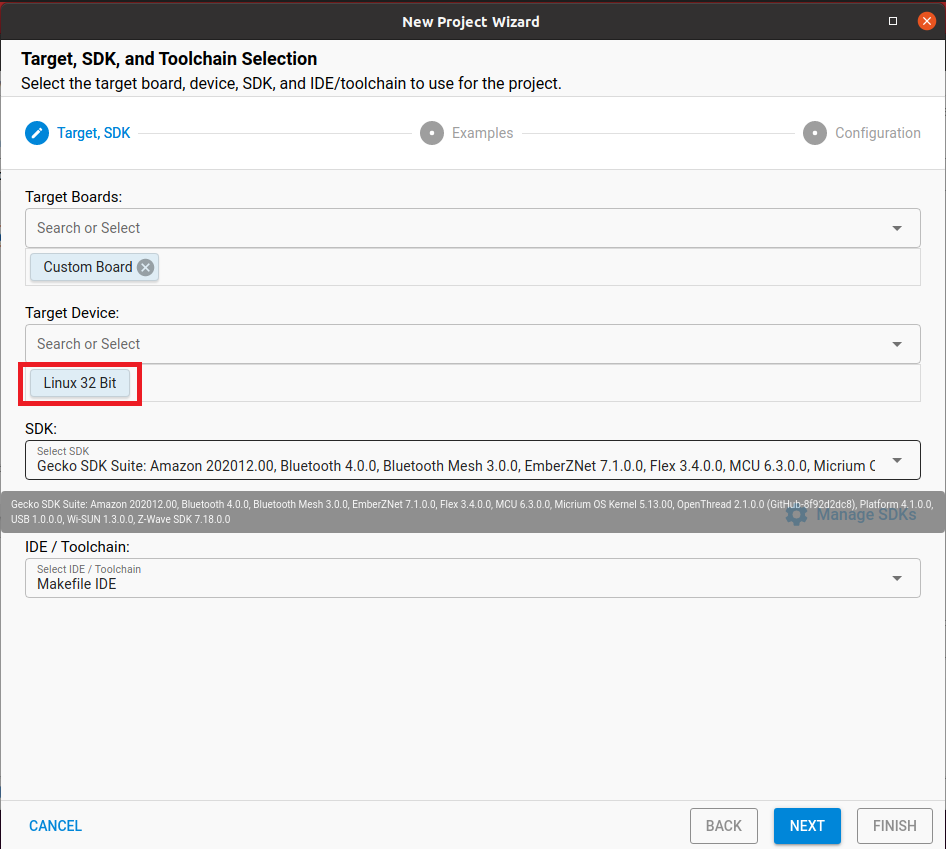
2. Start Simplicity Studio File->New->Silicon Labs Project Wizard... and set "Target Device" as "Linux 32 Bit" to click NEXT button.
 

3. Select "Zigbee - Host Gateway" and click NEXT button.


4. Make sure you set project location to under your GSDK 4.1.0 folder such as my example "/home/yk/SimplicityStudio/SDKs/gecko_sdk_2/Z3Gateway" and select "Copy contents" to click FINISH button.


5. Download and setup 2022-04-04-raspios-bullseye-armhf-lite.img for your Raspberry Pi.

6. Use sftp to copy the whole "/home/yk/SimplicityStudio" folder contents to your Raspberry Pi home folder.

7. Change direct to "~/SimplicityStudio/SDKs/gecko_sdk_2/Z3Gateway" on your Raspberry Pi and run "make -f Z3Gateway.Makefile" to build Z3Gateway

8. After build successfully, you will get Z3Gateway binary under "~/SimplicityStudio/SDKs/gecko_sdk_2/Z3Gatewaybuild/debug/". You can run Z3Gateway by "Z3Gateway -p /dev/ttyACM0" under this folder.


Wednesday, January 5, 2022

CLI command in EmberZnet to send IAS WD start warning command

 Using the following CLI command in EmberZnet to send IAS WD start warning command

//IAS WD Cluster: 0x0502
//ZCL header 01(Frame Control Byte) 0A (Transcation Seq no.) 00 (Command ID - Start Warning)
//ZCL Payload 10(0001(4 bits): Burglar mode 00(2 bits): Strobe/No 00(2 bits): Siren Level/low) FF00(Warning duration) 10(Strobe duty cycle) 00(Strobe level/low)
// Refer to section 8.4.2.3 in ZCL specification for details.

raw 0x502 {010A0010FF001000}

//0xB19D is short address of WD device and both 1 are source and destination endpoint.
send 0xB19D 1 1

Friday, October 15, 2021

How to use EmberZnet Cli command to send IAS WD command.

The following steps show you how to EmberZnet Cli command to send IAS WD command. 

1. Use any EFR32 to run SoC coordinator such as Z3Light example.

2. Use Cli "raw 0x502 {01000010000F0000}" to compose IAS WD command with raw data.

    Detail format of raw data in { } can be found in 2.4.1 General ZCL Frame Format of ZCL specification.

    01: Frame Control Field which can find details in section 2.4.1.1 of ZCL specification. 01 means "Command is specific or local to a cluster"

    00: Transaction sequence number

    00: Command identifier. Since we use "Command is specific or local to a cluster" in Frame Control Field. This command identifier should be matched to different cluster. In this case, it's IAS WD cluster (0x0502) Start warning (0x00) command which can be found in section 8.4.2.2 Commands Received of ZCL specification.

    10000F0000: Command Payload which is detailed in section 8.4.2.2.1.1 Payload Format of ZCL specification. 10 is Warning mode(Burglar)+Strobe(No)+Siren level(Low Level Sound). 000F is Warning Duration. 0000 is Strobe Duty Cycle and Strobe level.

3. Use Cli "send 0xD265 1 1" to send command to destination node with short address 0xD265 and endpoint 1.

4. You can verified the command is sent successfully on sniffer.


Monday, December 21, 2020

Create IAS CIE coordinator and IAS Zone Door Sensor using Silicon Labs EmberZnet

The following steps show you how to create IAS CIE coordinator and IAS Zone Door Sensor using Silicon Labs EmberZnet 6.9.0 

1. Create and run IAS CIE coordinator for BRD4180A.

    1.1 Using the following steps to create CIE project for BRD4180A.

    1.2 Select "HA IAS Control and Indication Equipment" as ZCL device type, "Coordinator or Router" as Zigbee Device type, and enable  IAS Zone Client/Network Creator related plugin.


    1.3 Generate code to build firmware and download firmware into BRD4180A.

    1.4 Launch console and use CLI command "plugin network-creator form 1 0x5678 13 13" to form centralized Zigbee 3.0 network.

    1.5 Use CLI command "plugin network-creator-security open-network" to allow IAS Zone device to join.


2. Create and run IAS Zone Door Sensor device for BRD4161A.

    2.1 Using the following steps to create IAS Zone project for BRD4161A.

    2.2 Select "HA IAS Zone" as ZCL device type, "Sleepy End Device" as Zigbee Device type, use 0x0015 as zone type, enable "Security Sensor Interface" and "Network Creator..." related plugin.


    2.3 Add the following pin defines in hal-config.h to simulate PB1 on BRD4001A as reed switch of door sensor.

            #define GPIO_SENSOR_PIN                       (7U)
            #define GPIO_SENSOR_PORT                      (gpioPortF)

    2.4  Generate code to build firmware and download firmware into BRD4161A.

    2.5 Launch console and use CLI command "plugin network-steering start 0" to join centralized Zigbee 3.0 network that is formed and opened in step 1.4 and 1.5.


    2.5 In sniffer log, you would see the following event that show you IAS Zone sensor works with CIE. Press PB1 on BRD4001A would send IAS Zone status change notification.


Wednesday, May 6, 2020

How Zigbee CIE and IAS device work.

The following steps show how Zigbee CIE and IAS device work:

1. ZC (act as CIE) enable permit join to allow IAS Zone device to join.

2. ZC does binding to IAS zone.

3. ZC sends a write attribute request to the joined IAS zone device to write the CIE IEEE Address attribute.

4. The joined IAS Zone device sends an IAS Zone Enrollment request to ZC (the CIE).

5. IAS zone device can send IAS Zone status report to ZC (the CIE) and ZC (the CIE) can receive IAS Zone report.

Wednesday, April 29, 2020

How to run node server with EmberZnet 6.7.3 Z3GatewayHost on Raspberry Pi.

Although Silicon Labs deprecates UG129: zigbee® Gateway Reference Design User's Guide, the following steps show you how to run node server with EmberZnet 6.7.3 Z3GatewayHost on Raspberry Pi.

1. Install the Raspbian Jessie Lite operating system on the SD card and start Raspberry Pi to ssh login.

2. Run the following command on console to install node server.

sudo chmod 666 /etc/apt/sources.list
sudo echo deb http://devtools.silabs.com/solutions/apt jessie main >> /etc/apt/sources.list
sudo apt-key adv --keyserver keyserver.ubuntu.com --recv-keys 90CE4F77
sudo apt-get update
sudo apt-get -y install silabs-zigbee-gateway
sudo apt-get -y install silabs-networking


3. Do "sudo reboot" to restart Raspberry Pi.

4. Login Raspberry Pi again and run "sudo service siliconlabsgateway stop" to stop siliconlabsgateway service.

5. Upload modified NCP.py and Z3GatewayHost to your Raspberry Pi root folder.

6.
  • Do "cd /opt/siliconlabs/zigbeegateway/tools/ncp-updater/" to switch to original NCP.py folder and make a copy of original NCP.py with "sudo mv ncp.py ncp-ori.py" if you want. 
  • Copy modified from Raspberry Pi root folder to /opt/siliconlabs/zigbeegateway/tools/ncp-updater/ using "sudo cp ~/ncp6.7.3.py ./ncp.py". 
  • Run "sudo chmod 777 ncp.py"
  • Run "sudo python ncp.py scan" and make sure you see the following response.


7.
  • Do "cd /opt/siliconlabs/zigbeegateway/bin" and run "sudo mv siliconlabsgateway siliconlabsgateway-ori" to make a copy of original siliconlabsgateway if you want. 
  • Copy Z3GatewayHost from Raspberry Pi root folder to /opt/siliconlabs/zigbeegateway/bin using "sudo cp ~/Z3GatewayHost ./siliconlabsgateway".
  • Run "sudo chmod 777 siliconlabsgateway" 
8. Run "sudo reboot" to restart Raspberry Pi and you can access to web service of Z3GatewayHost node server later.


9. If you want to build Z3GatewayHost by yourself, remember to enable all MQTT related and cJSON plugin to generate source codes.


Thursday, December 13, 2018

How to use EmberZNet to do ZCL report

The following steps show you how to use EmberZNet to do ZCL report

Using ZCL_TEMP_MEASUREMENT_CLUSTER_ID to send temperature attribute report as example.

1. Prepare ZCL data buffer with emberAfFillCommandGlobalServerToClientReportAttributes. The buffer format is Attribute ID -> Data type -> Attribute data. For Attribute ID and Attribute data, it's low byte first.

uint8_t buff[5] = {0x00, 0x00, 0x29, 0x05, 0x06};  //Attribute ID (0x0000) -> Data type (0x29) -> Attribute data (0x0605). emberAfFillCommandGlobalServerToClientReportAttributes(ZCL_TEMP_MEASUREMENT_CLUSTER_ID, (uint8_t *) buff, 5);

2. Set source and destination endpoint with emberAfSetCommandEndpoints

emberAfSetCommandEndpoints(1, 1); //endpoint(uint8_t sourceEndpoint, uint8_t destinationEndpoint):

3. Call the following line to do unicast to coordinator

emberAfSendCommandUnicast(EMBER_OUTGOING_DIRECT, 0x0000);


Or call the following line to do unicast using binding address.

emberAfSendCommandUnicastToBindings();

Wednesday, October 31, 2018

How to use CC2531EMK and Wireshark as Zigbee sniffer.

The following steps show you how to use CC2531EMK and Wireshark as Zigbee sniffer.

1. Download and install TI Wireshark Packet Converter 1.

2. Download and install TI Packet sniffer to get sniffer_fw_cc2531.hex under C:\Program Files (x86)\Texas Instruments\SmartRF Tools\Packet Sniffer\bin\general\firmware. After getting sniffer_fw_cc2531.hex, you can download it to your CC2531EMK using CC Debugger.

3. Plug CC2531EMK into PC and start TiWsPc to select CC2531EMK and Zigbee channel to start TI Wireshark Packet Converter 1.


4. Download and install TI Packet sniffer 2. Copy ti802154ge-x64-2x.dll and tirpi-x64-2x.dll from C:\Program Files (x86)\Texas Instruments\SmartRF Tools\SmartRF Packet Sniffer 2\wireshark\plugins\2.4.x to C:\Program Files (x86)\Wireshark\plugins\2.4.8 (my Wireshar version is 2.4.8 and yours might be different.)

5. Open Wireshark go to Edit > Preferences > Protocols > Zigbee add the Zigbee TC Link Key 5a6967426565416c6c69616e63653039

6. Create a new Desktop shortcut for Wireshark and add the following to the path: -i\\.\pipe\tiwspc_data -k


7. Start Wireshark with the new shortcut created in step 6 and you will see Wireshark sniffing Zigbee data.


Sunday, July 29, 2018

660 Zigbee devices in the same Zigbee network!


660 Zigbee devices in the same Zigbee network now!!! This time, we have total 660 Zigbee devices, including 130 ZRs (Smart Plugs) and 530 ZEDs (PIR motion sensors, Door Contact sensors, and Smoke Detectors), joined to a single Zigbee network. The solution is based on TI CC2530.


Thursday, December 7, 2017

How to use LAUNCHXL-CC2650 to work with Wireshark as Zigbee sniffer.

The following steps show you how to use LAUNCHXL-CC2650 to work with Wireshark as Zigbee sniffer.

1. Download and install PACKET-SNIFFER-2 from http://www.ti.com/tool/PACKET-SNIFFER
 
2. Connect the LaunchPad board to the PC with a USB cable and program sniffer_fw_15_4.hex under C:\Program Files (x86)\Texas Instruments\SmartRF Tools\SmartRF Packet Sniffer 2\sniffer_fw\bin\cc26x0lp\15.4 to your LAUNCHXL-CC2650 using Flash Programmer 2.


3. Start SmartRF Sniffer Agent and select Data -> Data Out to check "Use Pipe".


4. Press the Device Configuration button and select a sniffer device, frequency band and channel to use.


5. Press "Start All" button. The incoming data indicator becomes green and the outgoing data indicator becomes blue.


6. Install Wireshark and create a new desktop shortcut. Then, modify the Target setting of the new Wireshark shortcut to add "-i\\.\pipe\tiwspc_data -k" to the end.


7. Start Wireshark and go to Edit->Preferences...->Protocol->Zigbee to add Zigbee TC Link Key "5a6967426565416c6c69616e63653039".


8. Start the new Wireshark shortcut and you will see Wireshark starts to do Zigbee sniff.


Sunday, September 3, 2017

Secure Zigbee Pairing Using NFC

As we all know that Zigbee protocol is vulnerable when a new device join the network. If a non-preconfigured device joins a network, a single key may be sent unprotected and enable encrypted communication. This one-time transmission of the unprotected key results in a short time frame of exploitation in which the key could be sniffed by an attacker. We implement a more secure Zigbee Pairing Using NFC and all of implementations are based on TI CC2530-CC2592 and TRF7963A as the following block diagram. The network key is send through TRF7963A from Zigbee coordinator (connecting to IOT GW) to NFC tag which is connected to Zigbee device. So, network key won't go over the air during Zigbee pairing and it won't be captured by any Zigbee sniffer.


The following video gives a demonstration about the process.


Wednesday, May 10, 2017

How to generate Zigbee Host application code for EFR32 from Simplicity Studio

You can generate Zigbee Host application code for EFR32 from Simplicity Studio by doing the following steps:


1. Go to Simplicity Studio->New->New Project and select "Silicon Labs AppBuilder Project"


2. Select "ZCL Application Framework V2" and press Next button.


3. Select "EmberZnet 5.9.1.0 GA Host 5.9.1.0" and press Next button.


4. Select "HaGatewayReference" and press Next button.


5. Use default project name or input yours. Then, press Next button and Finish button.


6. Go to HAL configuration in HaGatewayReferenceHost.isc. Select EFR32-EZSP as Wireless Chip and your Host type in Platform configuration. Then, press "Generate" button to generate HaGatewayReferenceHost example code.

7. Put the generated HaGatewayReferenceHost example code to your target platform and build to run it.

Wednesday, February 15, 2017

Conversion between RSSI and LQI in Z-Stack

Z-Stack uses the following formula to convert RSSI and LQI.

LinkQuality = [255* (RSSI-MIN_ED)]/[MAX_ED-MIN_ED]

Therefore with simple algebra

RSSI = MIN_ED+LinkQuality*( MAX_ED-MIN_ED)/255

Default values for MIN_ED and MAX_ED are -87 and 10 respectively.

Then, maybe you can convert RSSI to distance...

Wednesday, August 31, 2016

How to handle end node announcement, active endpoint response, and simple descriptor response in Z-Stack for CC2530 and CC2538.

When a Zigbee device joins network, it would broadcast end node announcement with its short and IEEE address. We can register a callback event in Z-Stack to receive end node announcement and store short/IEEE address of device to a device list. Then, we usually call ZDP_ActiveEPReq to request active endpoint and register a callback event in Z-Stack to receive active endpoint response and store it to device list. Finally, we can call ZDP_SimpleDescReq to request simple descriptor and register a callback event in Z-Stack to receive simple descriptor response and store it to device list too.

The following steps show you how to handle end node announcement in Z-Stack SampleLight.

1. Add "ZDO_RegisterForZDOMsg(task_id, Device_annce);" in zclSampleLight_Init().

2. Add the following codes to process Device_annce event in zclSampleLight_ProcessZDOMsgs and you would get end node announcement  information in devAnnce structure.

  ZDO_DeviceAnnce_t devAnnce;

if ( pMsg->clusterID == Device_annce )
      ZDO_ParseDeviceAnnce( pMsg, &devAnnce );


The following steps show you how to handle active endpoint response in Z-Stack SampleLight.

1. Add "ZDO_RegisterForZDOMsg(task_id, Active_EP_rsp);" in zclSampleLight_Init().

2. Add the following codes to process Active_EP_rsp event in zclSampleLight_ProcessZDOMsgs and you would get end node announcement information in pActiveEndpointRsp pointer of ZDO_ActiveEndpointRsp_t structure.

  ZDO_ActiveEndpointRsp_t *pActiveEndpointRsp;

  if ( pMsg->clusterID == Active_EP_rsp )
      pActiveEndpointRsp = ZDO_ParseEPListRsp( pMsg );


The following steps show you how to handle simple descriptor response in Z-Stack SampleLight.

1. Add "ZDO_RegisterForZDOMsg(task_id, Simple_Desc_rsp);" in zclSampleLight_Init().

2. Add the following codes to process Simple_Desc_rsp event in zclSampleLight_ProcessZDOMsgs and you would get simple descriptor in simpleDescRsp structure.

  ZDO_SimpleDescRsp_t simpleDescRsp;

  if ( pMsg->clusterID == Simple_Desc_rsp )
      ZDO_ParseSimpleDescRsp( pMsg, &simpleDescRsp );

Friday, October 23, 2015

How to do device binding from TI Ztool and CC2531 USB dongle to CC2650 SensorTag using ZDO_BIND_REQ.

The following steps show how to do device binding from TI Ztool and CC2531 USB dongle to CC2650 SensorTag using  ZDO_BIND_REQ.

1. Refer to http://sunmaysky.blogspot.tw/2015/10/setup-zigbee-ha-coordinator-with-ti.html and setup Zigbee HA coordinator with TI Ztool and CC2531 USB dongle and use CC2650 SensorTag as Zigbee end device to join coordinator.


2. Use ZDO_IEEE_ADDR_REQ with ShortAddr=0 to request IEEE address of coordinator which we would need when we do binding request. In my test, it responses IEEEAddr: 0x00124B0002F1DC2B.


3. Send ZDO_BIND_REQ with DstAddr=0x65D1 (short address of CC2650STK), SrcAddress=0x124B00069F3B89 (IEEE address of CC2650STK), SrcEndPoint=9 (active endpoint of temperature cluster support in CC2650STK), ClusterID=0x0402 (Zigbee cluster temperature ID), BindAddrMode=0x03 (must use 64 Bits address mode), BindAddr=0x00124B0002F1DC2B (IEEE address of coordinator in test case),and BindEndPoint=7 (active endpoint on coordinator).


 4. After sending ZDO_BIND_REQ, you would receive ZDO_BIND_RSP which shows binding success. The temperature report would be receive as AF_INCOMING_MSG.


5. The temperature is shown on latest two bytes (little endian) of AF_INCOMING_MSG data

Setup Zigbee HA coordinator with TI Ztool and CC2531 USB dongle and use CC2650 SensorTag as Zigbee end device to join coordinator.

The following steps show you how to setup Zigbee HA coordinator with TI Ztool and CC2531 USB dongle and use CC2650 SensorTag as Zigbee end device to join coordinator.

1. Use CC Debugger to download CC2531ZNP-Pro-Secure_LinkKeyJoin.hex to your CC2531 USB dongle. Plug CC2531 USB dongle into USB socket of your PC and you should have it enum as a CDC Serial Port (mine is COM29 in the test.)


2. Set com port setting to 115200 Baudrate and Handshake as none


3. Press "Scan for devices" button on Ztool. If your COM port is scanned successfully in ZTool, it should looks like the following screen shot.


4. Run the attached script coordinator_light.zip to initialize coordinator from Ztool.


    p.s. The script uses Zigbee channel 11 and do remember to change ZC_Com in the script to your CC2531 virtual COM number. In my test, it is COM29.

5. Build Zigbee SensorTag (CC2650STK) to join as end device. Make sure you use -DDEFAULT_CHANLIST=0x00000800 (channel 11) in f8wconfig.cfg and set "xHOLD_AUTO_START" and "xNV_RESTORE" in ZStackCore. Set "xZCL_EZMODE" in SensorTag application. Compile SensorTag and download it to your CC2650STK.


6. Enable permit join on coordinator by sending ZDO_MGMT_PERMIT_JOIN_REQUEST with AddrMode=0x02, DstAddr=0, and Duration=255.


7.Power on CC2650STK and you should see ZDO_END_DEVICE_ANNCE_IND some seconds later.


Setup Zigbee HA coordinator with TI Ztool and CC2531 USB dongle and use CC2650 SensorTag as Zigbee end device to join coordinator.

The following steps show you how to setup Zigbee HA coordinator with TI Ztool and CC2531 USB dongle and use CC2650 SensorTag as Zigbee end device to join coordinator.

1. Use CC Debugger to download CC2531ZNP-Pro-Secure_LinkKeyJoin.hex to your CC2531 USB dongle. Plug CC2531 USB dongle into USB socket of your PC and you should have it enum as a CDC Serial Port (mine is COM29 in the test.)


2. Set com port setting to 115200 Baudrate and Handshake as none


3. Press "Scan for devices" button on Ztool. If your COM port is scanned successfully in ZTool, it should looks like the following screen shot.
 

4. Run the attached script coordinator_light.zip to initialize coordinator from Ztool.


    p.s. The script uses Zigbee channel 11 and do remember to change ZC_Com in the script to your CC2531 virtual COM number. In my test, it is COM29.

5. Build Zigbee SensorTag (CC2650STK) to join as end device. Make sure you use -DDEFAULT_CHANLIST=0x00000800 (channel 11) in f8wconfig.cfg and set "xHOLD_AUTO_START" and "xNV_RESTORE" in ZStackCore. Set "xZCL_EZMODE" in SensorTag application. Compile SensorTag and download it to your CC2650STK.


6. Enable permit join on coordinator by sending ZDO_MGMT_PERMIT_JOIN_REQUEST with AddrMode=0x02, DstAddr=0, and Duration=255.


7.Power on CC2650STK and you should see ZDO_END_DEVICE_ANNCE_IND some seconds later.