Showing posts with label 6lbr. Show all posts

Tuesday, April 24, 2018

How to setup Mosquitto on Raspberry Pi and make Contiki/Contiki-NG cc26xx-web-demo do mqtt publish to it.

The following steps show you how to setup Mosquitto on Raspberry Pi and make Contiki/Contiki-NG cc26xx-web-demo do mqtt publish to it.

1. Login to Raspberry Pi and do the following steps to install Mosquitto.
  • 1.1 Run "apt-get update" and "apt-get install mosquitto" to install Mosquitto server.
  • 2.2 Run "apt-get install mosquitto-clients" to install mosquitto_sub and mosquitto_pub.
2. Follow steps in How to configure 6lbr to make it can do ping6 to a CC26xx/CC13xx node from Raspberry Pi running 6lbr to setup 6lbr in bridge router mode.

3. Do "ifconfig" to get br0 IPv6 address. In my case, it's "bbbb::e786:9d85:9446:709".


4. Go to cc26xx-web-demo MQTT/IBM Cloud Config page and set "bbbb::e786:9d85:9446:709" as broker IP.


5. Open another ssh login to Raspberry pi and run "mosquitto_sub -h bbbb::e786:9d85:9446:709 -t iot-2/evt/status/fmt/json" to subscribe to ccx6xx-web-demo publish topic. You should be it receives cc26xx-web-demo published MQTT messages.


p.s. You can also use "mosquitto_pub -h bbbb::e786:9d85:9446:709 -p 1883 -t iot-2/evt/status/fmt/json -m "hello"" to test MQTT message publish from Raspberry Pi terminal.

6. The following steps show you how to toggle red led on LAUNCHXL-CC1310 or LAUNCHXL-CC2560 running cc26xx-web-demo.
  •  Use "test" as Org ID instead of "quickstart" and "123456" as Auth Token instead of empty.
  • Click "Submit" to make cc26xx-web-demo to reconnect to mqtt server.
  • Start a ssh login to raspberry pi. Use "mosquitto_pub -h bbbb::e786:9d85:9446:709 -m "1" -t iot-2/cmd/leds/fmt/json" to turn on red led, or "mosquitto_pub -h bbbb::e786:9d85:9446:709 -m "0" -t iot-2/cmd/leds/fmt/json" to turn off red led.


Monday, April 23, 2018

How to connect Contiki-NG cc26xx-web-demo to IBM Watson IoT Platform.

The following steps show you how to connect Contiki-NG cc26xx-web-demo (running on LAUNCHXL-1310 or LAUNCHXL-CC2650) to IBM Watson IoT Platform.

1. Setup IBM Watson IoT Platform.
  • 1.1 Login to IBM Watson IoT Platform and go to SECURITY tab of Device page to use "TLS Optional". This step is critical. If you don't do this, you need to use TLS for connection and default cc26xx-web-demo won't work.

  • 1.2 Go to Device Types tab of Device page to click "Add Device Type".
  • 1.3 Input device type name. I use cc26xx-web-demo in this demo.
  • 1.4 Follow all the steps to finish add device type.
  • 1.5 Switch to Browse tab of Device page to click "Add Device".
  • 1.6 Select "Select Existing Device Type" to cc26xx-web-demo and input Device ID which I use device MAC address.
  • 1.7 Input authentication token.
  • 1.8 Keep your device credentials carefully.
  • 1.9 Finish adding device and you would see it on Browse tab of device page.

2. Running 6lbr and wrapsix on Raspberry Pi first and connect your cc26xx-web-demo running on LAUNCHXL-CC1310 or LAUNCHXL-CC2650 to your 6lbr and configure cc26xx-web-demo.
  • 2.1 Open "MQTT/IBM Cloud Config" page.
  • 2.2 Configure cc26xx-web-demo for IBM Watson IoT platform according to device credentials in step 1.7.
  • 2.3 Run "ping uc6bmi.messaging.internetofthings.ibmcloud.com" to get its IPv4 address 169.45.2.20.
  • 2.4 Change broker IP to "0064:ff9b:0000:0000:0000:0000:a92d:0214" which is IPv6 address of "169.45.2.20".
  • 2.5 Click "Submit" on "MQTT/IBM Cloud Config" page to connect to IBM Watson IoT platform.

Thursday, April 19, 2018

Build and run 6lbr/Contiki-NG cc26xx-web-demo on Rasperry Pi with LAUNCHXL-CC1310/LAUNCHXL-CC2650

The following steps show how to build and run 6lbr/Contiki-NG cc26xx-web-demo on Rasperry Pi with LAUNCHXL-CC1310/LAUNCHXL-CC2650:

1. Build Contiki-NG slip radio for LAUNCHXL-CC1310 on InstantContiki 3.0 or Cygwin (you can refer here to setup Cygwin build environment)
  • 1.1 Do "git clone --recursive https://github.com/contiki-ng/contiki-ng"
  • 1.2 Switch to directory contiki-ng/
  • 1.3 Do "git submodule sync" and "git submodule update --init"
  • 1.4 Switch to directory contiki-ng/examples/slip-radio
  • 1.5 Since 6lbr/Contiki-NG only supports RPL-CLASSIC now, we use "make TARGET=cc26x0-cc13x0 srf06-cc26xx BOARD=launchpad/cc1310 MAKE_ROUTING=MAKE_ROUTING_RPL_CLASSIC  slip-radio.bin" to build slip radio for LAUNCHXL-CC1310.
  • 1.6 Download slip-radio.bin to one LAUNCHXL-CC1310 to act as slip radio for Raspberry Pi later.

2. Build Contiki-NG cc26x0-web-demo for LAUNCHXL-CC1310 on InstantContiki 3.0 or Cygwin
  • 2.1 Apply Fixing cc26xx 6lbr client example patch first.
  • 2.2 Switch to directory contiki-ng/examples/platform-specific/cc26xx/cc26x0-web-demo
  • 2.3 Since 6lbr/Contiki-NG only supports RPL-CLASSIC now, we use "make TARGET=srf06-cc26xx BOARD=launchpad/cc1310 MAKE_ROUTING=MAKE_ROUTING_RPL_CLASSIC  cc26xx-web-demo.bin" to build cc26xx-web-demo for LAUNCHXL-CC1310.
  • 2.4 Download cc26xx-web-demo.bin to another LAUNCHXL-CC1310 to join Raspberry Pi 6lbr later.

3. Build 6lbr/Contiki-NG on Rasperry Pi
  • 3.1 SSH login to Raspberry Pi.
  • 3.2 Change directory to home folder and git clone --recursive https://github.com/cetic/6lbr.git
  • 3.3 Change directory to 6lbr folder and do "git submodule update --init" git checkout contiki-ng
  • 3.4 Change directory to home folder and git clone --recursive https://github.com/cetic/contiki-ng.git
  • 3.5 Change directory to contiki-ng folder and do "git submodule update --init" git checkout sixlbr
  • 3.6 Change directory to 6lbr/examples/6lbr folder and run the following build command
    "make WITH_CONTIKI=0 CONTIKI=~/contiki-ng WERROR=0 all"
  • 3.7  After build successfully, do "sudo make install". You will see "install: cannot stat ‘tools/nvm_tool’: No such file or directory" issue since nvm_tool doens't make properly for current version. It might be fixed later but you can use nvm_tool built by previous 6lbr to do the following steps.
  • 3.8 Run "sudo /usr/lib/6lbr/bin/nvm_tool --update --channel 25 /etc/6lbr/nvm.dat" to change 6lbr/Contiki-NG to use channel 25.
  • 3.9 Run "/usr/lib/6lbr/bin/nvm_tool --print /etc/6lbr/nvm.dat" to make sure it switches to channel 25.
  • 3.10 Connect LAUNCHXL-CC1310 running slip radio to Raspberry Pi.
  • 3.11 Run "sudo service 6lbr start" to start 6lbr/Contiki-NG and you can use Firefox to access to [bbbb::100]


 4. Power on LAUNCHXL-CC1310 running cc26xx-web-demo and you will see it pops on sensors tab of 6lbr web page. You can test http or coap function on cc26xx-web-demo now.


Monday, October 23, 2017

How to configure 6lbr to make it can do ping6 to a CC26xx/CC13xx node from Raspberry Pi running 6lbr.

The following steps shows you how to configure 6lbr to make it can do ping6 to a CC26xx/CC13xx node from Raspberry Pi running 6lbr.

1. Run "sudo vi /etc/6lbr/6lbr.conf" on Raspberry Pi terminal and use the following bridge mode settings.

RAW_ETH=0
BRIDGE=1
CREATE_BRIDGE=0
DEV_BRIDGE=br0
DEV_TAP=tap0
DEV_ETH=eth0
DEV_ETH_FCS=0

DEV_RADIO=/dev/ttyACM0
BAUDRATE=115200

LOG_LEVEL=3

2. Run "sudo vi /etc/network/interfaces" on Raspberry Pi terminal and Make sure you have the following br0 settings (red lines) added.

auto lo
iface lo inet loopback

auto wlan0
allow-hotplug wlan0
iface wlan0 inet manual
wpa-conf /etc/wpa_supplicant/wpa_supplicant.conf

#auto wlan1
#allow-hotplug wlan1
#iface wlan1 inet manual
#wpa-conf /etc/wpa_supplicant/wpa_supplicant.conf

iface eth0 inet static
address 0.0.0.0

auto br0
iface br0 inet dhcp
bridge_ports eth0
bridge_stp off
up echo 0 > /sys/devices/virtual/net/br0/bridge/multicast_snooping
post-up ip link set br0 address 'ip link show eth0 | grep ether | awk '{print $2}''


3. Restart your Raspberry Pi (sudo reboot) and 6lbr (sudo service 6lbr start) to apply those changes.

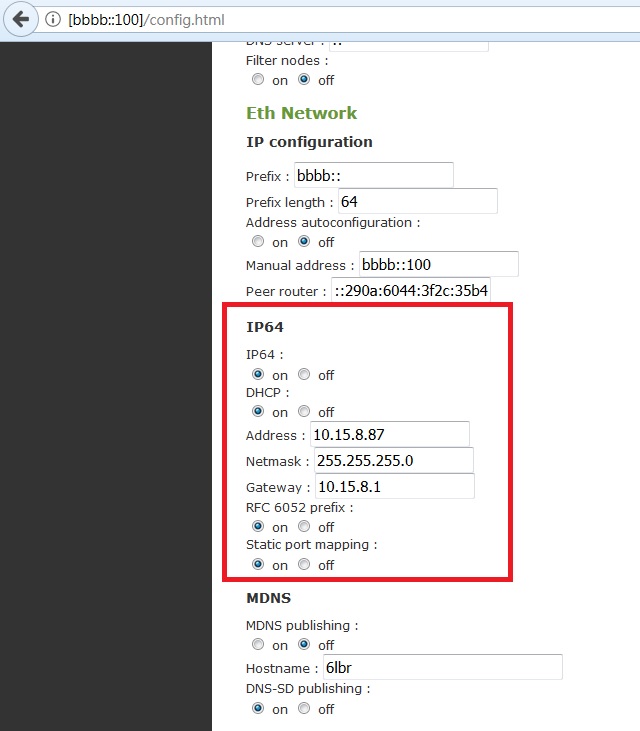
4. Make sure you enable IP64 on your 6lbr configuration page.


5. Run "sudo route -A inet6 add fd00::/64 gw bbbb::100" to add routing of fd00::/64 to bbbb::100


6. Check IPv6 address of your CC26xx/CC13xx node


7. Run "ping6 fd00::212:4b00:e00:cc0" to ping your CC26xx/CC13xx node and get responses.


Thursday, April 27, 2017

Running 6lbr on Raspberry Pi with WiFi enable

The following steps show you how to run 6lbr on Raspberry Pi with WiFi enable. I use Wi-Pi WiFi dongle in my test.

1. Run "sudo iwlist wlan0 scan" to scan WiFi AP

2. Edit wpa_supplicant.conf to add your WiFi AP SSID, password, and settings by running "sudo vi /etc/wpa_supplicant/wpa_supplicant.conf"


3. Run "sudo ifdown wlan0" and "sudo ifup wlan0" to restart wlan0.

4. Kill existing wpa_supplicant process by running "sudo kill -9 $(ps -ef | grep wpa | awk '{print $2}')" and run "sudo wpa_supplicant -B -i wlan0 -c /etc/wpa_supplicant/wpa_supplicant.conf" to start it again with new settings in wpa_supplicant.conf.

5. Run "sudo dhclient" to get DHCP client IP and run "ifconfig wlan0" to check if you get correct client IP.


6. Restart Raspberry Pi and ssh to it using wlan0 DHCP client IP get in step 5.

7. Edit /etc/6lbr/6lbr.conf to use wlan0 as ETH interface.


8. Start 6lbr and you can test it with wlan0 now.

For details of running 6lbr with CC2531EMK on Raspberry Pi, you can refer to "Setup 6lbr to run 6LowPAN with CC2531 USB dongle on Raspberry Pi 2B."

Thursday, March 9, 2017

SPI connection between LAUNCHXL-CC1310/LAUNCHXL-CC2650 and ENC28J60 to run 6lbr

You can do the following SPI connection between ENC28J60 and LAUNCHXL-CC1310/LAUNCHXL-CC2650 to run 6lbr
  • SCLK : LaunchPad DIO10
  • MOSI : LaunchPad DIO9
  • MISO : LaunchPad DIO8
  • CS : LaunchPad DIO14
  • GND :  LaunchPad GND
  • VCC : LaunchPad 3V3

6lbr SW can be built by following steps in http://sunmaysky.blogspot.tw/2017/01/build-6lbr-for-cc2650dk-or-cc1310dk.html . After run 6lbr on LAUNCHXL-CC1310/LAUNCHXL-CC2650, you can see the following UART output.


Wednesday, February 15, 2017

How to do settings to allow access 6lbr from Internet

The following steps show you how to do settings to allow access 6lbr from Internet. Let's say we have a Internet router (mine is Asus RT-N12HP_B1) and the LAN address is 192.168.1.xxx.

1. Access to 6lbr web page (http://[bbbb::100]) inside LAN and go to configuration page of 6lbr. Select IP64: on, DHCP: off, input a IPv4 address 192.168.1.2 (this might be different if you don't use 192.168.1.xxx as LAN address on your Internet router and you can use other IP such as 192.168.1.123 if you like it more.), and set Gateway as 192.168.1.1 (this might be also different if you don't use 192.168.1.xxx as LAN address on your Internet router). Then, press "Submit" to restart 6lbr.


2.  After restarting, you can check IP64 Address is 192.168.1.2 now on 6lbr Info page.


3. Next, let's check settings on Internet router (mine is Asus RT-N12HP_B1). We can see the external IP of this router is 220.136.172.175.


4.I add a port forwarding rule (assign http service port to 6lbr IPv4 address 192.168.1.2) to this Internet router and restart it.


5. Now, I can access 6lbr from another desktop from elsewhere on Internet by http://220.136.172.175


Wednesday, January 11, 2017

Build 6lbr running on CC2650DK, CC1310DK, LAUNCHXL-CC2650 or LAUNCHXL-CC1310

The following steps show how to build 6lbr running CC2650DK or CC1310DK

1. Refer to http://sunmaysky.blogspot.tw/2016/03/running-6lbr-on-cc2538dk-with-enc28j60.html which shows you how to connect ENC28J60 to SmartRF06EB.

2. git clone --recursive https://github.com/cetic/6lbr

3. Change "#define CETIC_6LBR_NVM_DEFAULT_CHANNEL 26" in \6lbr\examples\6lbr\6lbrnvm-data.h to "#define CETIC_6LBR_NVM_DEFAULT_CHANNEL 25"

4.  Add "#define RF_CORE_CONF_CHANNEL 25" into common configuration in \6lbr\examples\6lbr\project-conf.h

5. Change directory to \6lbr\examples\6lbr

6. Change the macro CETIC_6LBR_NVM_SIZE from 2048 to 4096 in file cc26xx-int-nvm.c (p.s. this is not necessary if you use LAUNCHXL-CC2650 or LAUNCHXL-CC1310)
          #define CETIC_6LBR_NVM_SIZE 4096//2048

7a. Run "make TARGET=srf06-cc26xx BOARD=srf06/cc26xx all" for CC2650DK or
7b. Run "make TARGET=srf06-cc26xx BOARD=srf06/cc13xx all" for CC1310DK or
7c. Run "make CC26XX_NVM=ext TARGET=srf06-cc26xx BOARD=launchpad/cc2650 all" for LAUNCHXL-CC2650 or
7d. Run "make CC26XX_NVM=ext TARGET=srf06-cc26xx BOARD=launchpad/cc1310 all" for LAUNCHXL-CC1310

8. Download cetic_6lbr_router.bin under \6lbr\examples\6lbr\bin_srf06-cc26xx to CC2650DK , CC1310DK, LAUNCHXL-CC2650, or LAUNCHXL-CC1310 with Flash Programmer 2.

9. You should see the following outputs on UART of CC2650DK , CC1310DK, LAUNCHXL-CC2650, or LAUNCHXL-CC1310.


9. You can access to [bbbb::100] now.


Tuesday, March 22, 2016

Running 6lbr on CC2538DK with ENC28J60 and make CC2650STK send sensor data to IBM MQTT quickstart service.

The following steps show how to run 6lbr on CC2538DK with ENC28J60 and make CC2650STK send sensor data to IBM MQTT quickstart service.

For CC2538DK and ENC28J60,

1. Connect CC2538DK with ENC28J60.

  • SCLK : CC2538 Port A2 (mapped to RF1.16 on P407 of SmartRF06EB)
  • MOSI : CC2538 Port A4 (mapped to RF1.18 on P407 of SmartRF06EB)
  • MISO : CC2538 Port A5 (mapped to RF1.20 on P407 of SmartRF06EB)
  • CS : CC2538 Port B5 (mapped to RF1.17 on P407 of SmartRF06EB)


2. Git 6lbr develop version from Github
 
 git clone https://github.com/cetic/6lbr
 git checkout develop

3. Build 6lbr for CC2538DK with ENC28J60

make TARGET=cc2538dk all

4. Use Flash Programmer 2 to download cetic_6lbr_router.bin (under \6lbr\examples\6lbr\bin_cc2538dk) to CC2538DK.


For CC2650STK,

1. Git Contiki from Github (refer to http://sunmaysky.blogspot.tw/search/label/Cygwin)

2. Add the following lines in project-conf.h of cc26xx-web-demo example to use nullRDC

#undef NETSTACK_CONF_RDC
#define NETSTACK_CONF_RDC     nullrdc_driver

3. Build cc26xx-web-demo.bin for CC2650STK

make BOARD=sensortag/cc2650 cc26xx-web-demo.bin

4. Use Flash Programmer 2 to download cc26xx-web-demo.bin to CC2650STK


Enable NAT64 to make CC2650STK can report sensor data to IBM MQTT quickstart service.

1. Connect Ethernet cable to CC2538DK-ENC28J60 and power on to run 6lbr.

2. Use Firefox to open web page at [bbbb::100] and switch to Configuration page. Change channel to 25 and select all options under IP64: to on. Press Submit button to write configurations and restart 6lbr.


3. Turn on CC2650STK to make it join 6lbr. Click on the web link in sensor page.


4.In sensor web page, click "IBM Quickstart"


5. Sensor data from CC2650STK would show on IBM MQTT quickstart service.


Monday, August 17, 2015

Setup 6lbr to run 6LowPAN with CC2531 USB dongle on Raspberry Pi 2B

1. Unzip and flash a CC2531 USB dongle with cc2531-slip-radio_contikimac.zip.
2. SSH login to Raspberry Pi.
3. sudo apt-get install libncurses5-dev
4. sudo apt-get install bridge-utils
5. sudo vi /boot/cmdline.txt file and add the following configuration parameter in the beginning of cmdline.txt
    dwc_otg.speed=1
6a. git clone --recursive https://github.com/cetic/6lbr
6b. cd 6lbr and run "sudo git submodule sync" and "sudo git submodule update --init"
7. cd 6lbr/examples/6lbr
8. make all plugins tools ---> This step takes lots of time so go for a break!
9. sudo make install
10. Create /etc/6lbr/6lbr.conf with the content below
      MODE=ROUTER

      RAW_ETH=1
      BRIDGE=0
      DEV_BRIDGE=br0
      DEV_TAP=tap0
      DEV_ETH=eth0
      RAW_ETH_FCS=0

      DEV_RADIO=/dev/ttyACM0
      BAUDRATE=115200

      LOG_LEVEL=3
11. Change to channel 25,which is used by cc26xx Contiki port
      $sudo /usr/lib/6lbr/bin/nvm_tool --update --channel 25 /etc/6lbr/nvm.dat
12. Run "/usr/lib/6lbr/bin/nvm_tool --print /etc/6lbr/nvm.dat" to make sure it switches to channel 25.

13. Plug CC2531 USB dongle to Raspberry Pi and the dongle should appear as /dev/ttyACM0. Run "sudo lsusb -v" to verify this.

14. run "sudo service 6lbr start" to start 6lbr.

15. Open browser like Firefox and input [bbbb::100].