Monday, April 29, 2024

Create and build Z-Wave - NCP Serial API Controller firmware for Z-Wave 800 ZGM230SA SoC

The following steps show you how to create and build Z-Wave - NCP Serial API Controller firmware for Z-Wave 800 ZGM230SA SoC.

Before you do anything, please make sure the secure firmware on your ZGM230SA is update to latest one. When I write this article, I use GSDK 4.4.1/Z-Wave SDK 7.20.2 and the latest secure firmware version for ZGM230SA is 2.2.4 for your reference.


To have Z-Wave - NCP Serial API Controller firmware working, you need to create and build Bootloader - NCP UART XMODEM first.The follow steps show you the details to create and build it.

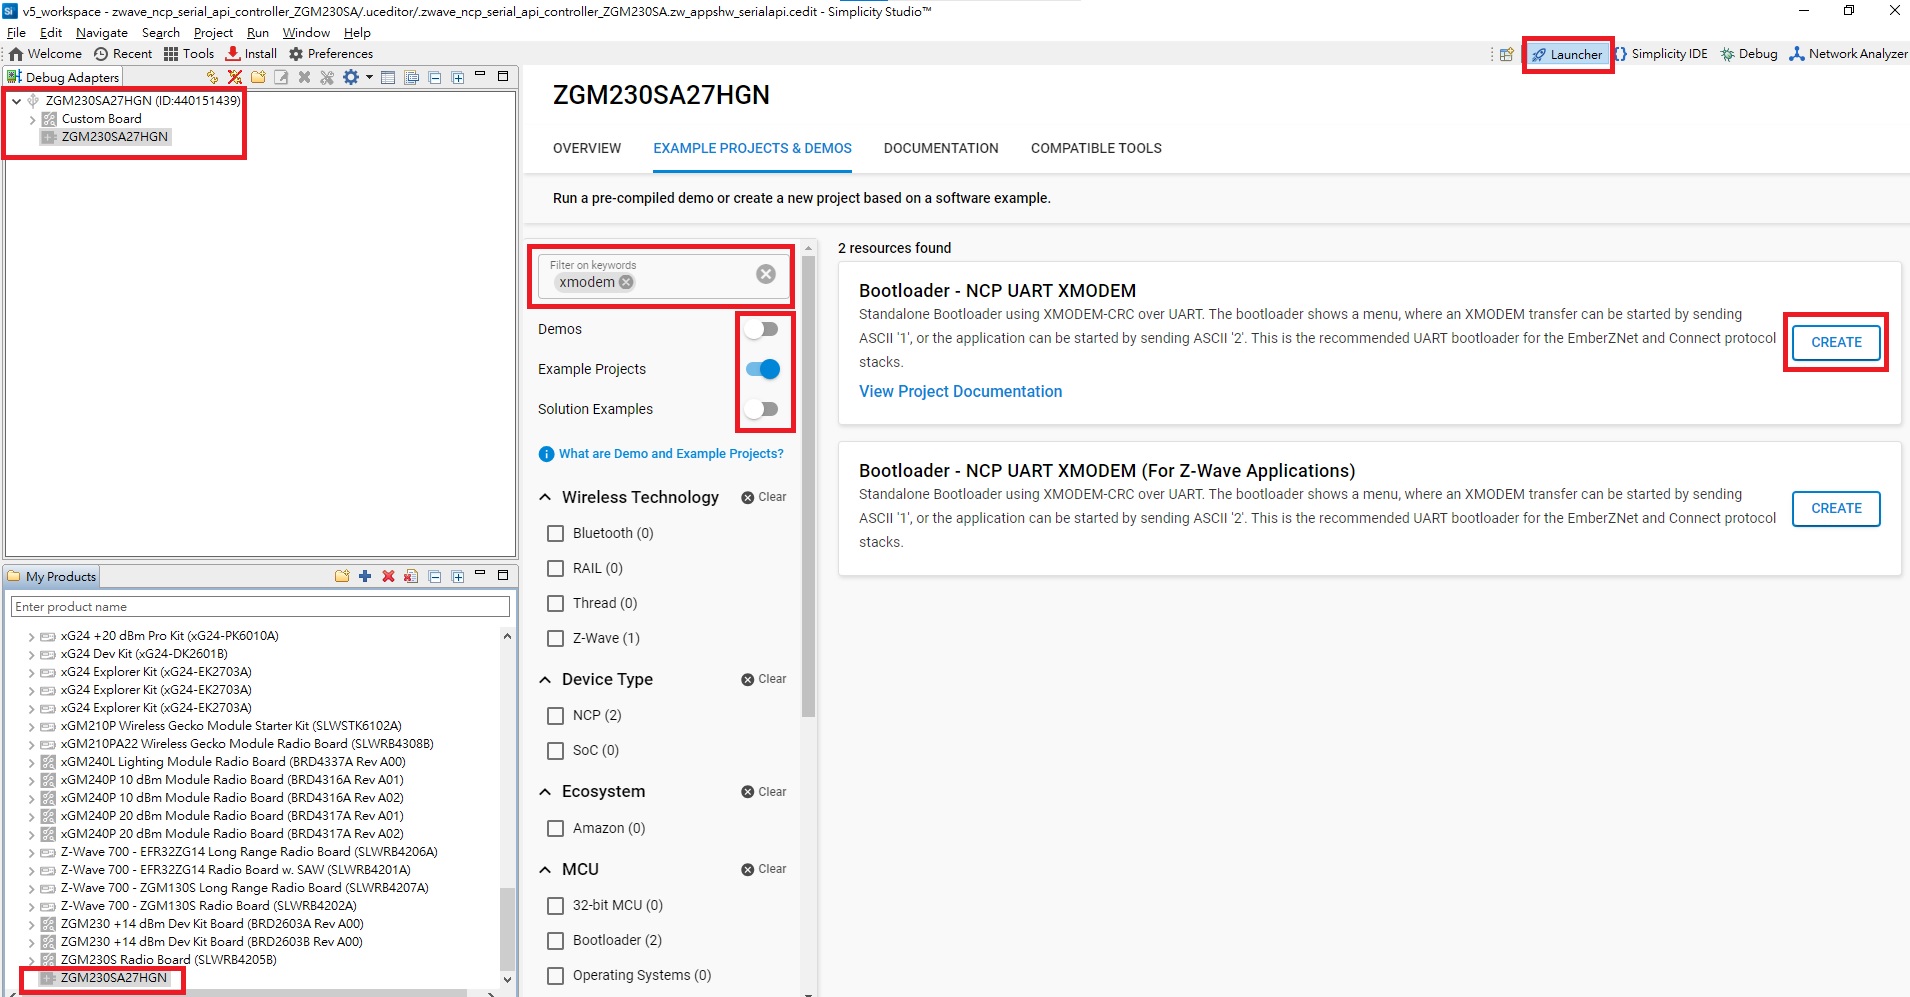
1. Start Simplicity Studio v5 and go to Launcher perspective with your custom ZGM230SA borad connected or selecting ZGM230SAin "My Products" perspective. Create Bootloader - NCP UART XMODEM project as the following screenshot.

2. Go to "Bootloader UART Driver" and "GPIO activation" software component to configure UART TX/RX and SL_BTL_BUTTON pins according to your ZGM230SA custom board schematics.


3. Build and download Bootloader - NCP UART XMODEM firmware to your ZGM230SA custom board.

Then, you can create and build Z-Wave - NCP Serial API Controller firmware for your custom ZGM230SA board using the following steps:

1. Create Z-Wave - NCP Serial API Controller project as the following screenshot.

2. Go to "SerialAPI AppsHw" software component to configure UART TX/RX pins according to your ZGM230SA custom board schematics.

3. Build and download Z-Wave - NCP Serial API Controller firmware to your ZGM230SA custom board.

 After download both "Bootloader - NCP UART XMODEM" and "Z-Wave - NCP Serial API Controller firmware" firmware to your ZGM230S custom board, you can connect it with serial-to-USB convertor to your desktop and run Z-Wave PC controller to test it.

Tuesday, November 28, 2023

瘋魔! 成佛? 發騷友的 Zorin Audio TP-S1 / Tien Audio TT3 雙唱盤 6唱頭 6唱臂

進入黑膠世界30年也收集數千唱片,從一開始單一唱盤唱頭唱臂到現在終於完成自己建置雙唱盤兩套系統,共6唱頭6唱臂用來聽不同類型唱片的發騷夢想;基礎設施的唱盤當然是最重要的,在預算有限錙銖必較的狀況要能每個唱盤搭配3唱頭3唱臂圓夢,不二人選當然就是台灣之光Zorin Audio TP-S1以及Tien Audio TT3唱盤,加上這兩年喜歡上的Ortofon SPU 唱頭以及傳說中最佳搭配的Fidelity Research FR-64S 及 Ortofon RS-309D 動態平衡唱臂個來一隻,另外原本Zorin PSS-9 單點支撐臂加上Audio Technica AT33ML/LC-OFC MC 唱頭,還有Tien Audio Viroa 12" 單點磁感抗滑碳纖唱臂加上Fidelity Research FR-1 MK3銀線版 MC 唱頭可以跟SPU唱頭比較不同的音樂類型及聽感,此外再加上Fidelity Research FR-24 唱臂搭配ADC TRX-1 MM 唱頭以及SME 3009S2靜態平衡唱臂搭配Audio Technica AT-MONO3/LP MC 唱頭適材適用的來聆聽一些Jazz唱片以及Mono唱片.以上,雖然每個單品不見得是頂級的設備(或是說頂級的價格),但是也都是自己心頭好的一時之選,讓我在有限的預算內最佳化我的音樂饗宴,剩下的就是好好享受音樂了...

Zorin Audio TP-S1唱盤,搭配如下:

1. Zorin PSS-9 單點支撐臂 + Audio Technica AT33ML/LC-OFC MC 唱頭

2. Ortofon RS-309D 12動態平衡唱臂 + Ortofon SPU CLASSIC GE MC 唱頭

3. Fidelity Research FR-24 唱臂 + ADC TRX-1 MM 唱頭


Tien Audio TT3唱盤,搭配如下:

1. Tien Audio Viroa 12" 單點磁感抗滑碳纖唱臂 + Fidelity Research FR-1 MK3銀線版 MC 唱頭

2. Fidelity Research FR-64S 動態平衡唱臂 + Ortofon SPU #1S MC 唱頭

3. SME 3009S2 靜態平衡唱臂 + Audio Technica AT-MONO3/LP MC 唱頭


Wednesday, October 4, 2023

DIY SwitchBot using Matter Over Thread running on Silicon Labs EFR32xG24 Explorer Kit in 5 Minutes.

The following steps guide you to DIY SwitchBot using Matter Over Thread running on Silicon Labs EFR32xG24 Explorer Kit xG24-EK2703A in 5 minutes.

1. Make sure you install Silicon Labs Simplicity Studio v5 and GSDK 4.3.1 with Matter extension 2.1.0-1.1.

2.Connect your xG24-EK2703A kit to your desktop and create "Matter - SoC OnOff Plug over Thread" project as base for your DIY SwitchBot using Matter Over Thread project.

3.Install and add a "sg90" PWM instance in "SOFTWARE COMPONENTS"

4.Configure "sg90" instance to use Timer0 PA00 as PWM output with PWM frequency 50 Hz.


5. Replace source code in "void AppTask::ActionCompleted(OnOffPlugManager::Action_t aAction)" with the following codes (red lines), which implements on/off rotating position for SG90 to turn on/off switch.

//YK for SG90 SwitchBot
#include "sl_pwm.h"
#include "sl_pwm_init_sg90_config.h"
#include "sl_sleeptimer.h"

extern sl_pwm_instance_t sl_pwm_sg90;

void AppTask::ActionCompleted(OnOffPlugManager::Action_t aAction)
{
    // action has been completed on the outlet
    if (aAction == OnOffPlugManager::ON_ACTION)
    {
        SILABS_LOG("Outlet ON")
        sl_pwm_set_duty_cycle(&sl_pwm_sg90, 2);
        sl_pwm_start(&sl_pwm_sg90);
        sl_sleeptimer_delay_millisecond(200);
        sl_pwm_set_duty_cycle(&sl_pwm_sg90, 5);
        sl_sleeptimer_delay_millisecond(200);
        sl_pwm_stop(&sl_pwm_sg90);
    }
    else if (aAction == OnOffPlugManager::OFF_ACTION)
    {
        SILABS_LOG("Outlet OFF")
        sl_pwm_set_duty_cycle(&sl_pwm_sg90, 9);
        sl_pwm_start(&sl_pwm_sg90);
        sl_sleeptimer_delay_millisecond(200);
        sl_pwm_set_duty_cycle(&sl_pwm_sg90, 5);
        sl_sleeptimer_delay_millisecond(200);
        sl_pwm_stop(&sl_pwm_sg90);
    }
#ifdef SL_CATALOG_SIMPLE_BUTTON_PRESENT
    if (sAppTask.mSyncClusterToButtonAction)
    {
        chip::DeviceLayer::PlatformMgr().ScheduleWork(UpdateClusterState, reinterpret_cast<intptr_t>(nullptr));
        sAppTask.mSyncClusterToButtonAction = false;
    }
#endif
}

6. Add the following two line to set initial SG90 position after "sl_pwm_init(&sl_pwm_sg90, &pwm_sg90_config);" in "void sl_pwm_init_instances(void)".

  //YK for SG90 SwitchBot
  sl_pwm_set_duty_cycle(&sl_pwm_sg90, 5);
  sl_pwm_start(&sl_pwm_sg90);

7. Build and download firmware into xG24-EK2703A kit(remember to dowload bootloader into the kit too)

8. Connect GND, PWR, Signal line of SG90 to GND, 3V3, and PWM pin on xG24-EK2703A kit.

9.Start RTT viewer to get QR code link for Matter Provision.


10. Since Apple Home supports Matter Over Thread now, we use Apple HomePod mini (iOS 17) and iPhone Home App to add our DIY SwitchBot into Apple Home.

11. Now, we can mount the DIY SwitchBot to wall switch and use Apple Home to control wall switch/light remotely.


Thursday, September 7, 2023

Adding reporting period configuration in configuration command class to Z-Wave Multilevel sensor example running on BRD2603A/ZGM230S

The following steps and codes show you how to add a reporting period configuration with configuration command class to allow changing auto report period in Z-Wave Multilevel sensor example running on BRD2603A/ZGM230S

1. Create zwave_soc_multilevel_sensor in Simplicity Studio v5 with GSDK4.3.1/Z-Wave SDK 7.20.1.0.

2. Add 3rd parameter to "configurations:" section in MultilevelSensor.cc_config and SSv5 would rebuilt parameters in parameter_pool inside cc_configuration_config.c accordingly

    - name: "auto report period"
      number: 3
      file_id: 2
      info: "sensor auto reporting period"
      size: CC_CONFIG_PARAMETER_SIZE_32_BIT
      format: CC_CONFIG_PARAMETER_FORMAT_SIGNED_INTEGER
      min_value: 1
      max_value: 3600
      default_value: 1800
      altering_capabilities: 0
      read_only: 0
      advanced: 0

3. In CC_MultilevelSensor_Support.c, revise the following codes:

#define DEBUGPRINT
#include "DebugPrint.h"
#include "CC_Configuration.h"

SSwTimer cc_multilevel_sensor_autoreport_timer;
uint32_t autoreport_time = 30;

static void cc_multilevel_sensor_init(void)
{
  cc_multilevel_sensor_config_register_instances();
  cc_multilevel_sensor_init_all_sensor();
  ZAF_nvm_read(2, &autoreport_time, 4);
  DPRINTF("configuration_pool_init[2].parameters->attributes.default_value %d\r\n", (int)autoreport_time );

  AppTimerDeepSleepPersistentRegister(&cc_multilevel_sensor_autoreport_timer, false, cc_multilevel_sensor_autoreport_callback);
  AppTimerDeepSleepPersistentStart(&cc_multilevel_sensor_autoreport_timer, autoreport_time*1000);
}

static void cc_multilevel_sensor_autoreport_callback(SSwTimer *pTimer)
{
  UNUSED(pTimer);
  cc_multilevel_sensor_send_sensor_data();
  AppTimerDeepSleepPersistentStart(&cc_multilevel_sensor_autoreport_timer, autoreport_time*1000);
}

4. In CC_Configuration.c, add the following red lines into cc_configuration_set.

#include "SwTimer.h"
extern SSwTimer cc_multilevel_sensor_autoreport_timer;
extern uint32_t autoreport_time;
static cc_config_configuration_set_return_value
cc_configuration_set(uint16_t parameter_number,  cc_config_parameter_value_t* new_value, cc_config_parameter_size_t size)
{
  cc_config_configuration_set_return_value return_value = CC_CONFIG_RETURN_CODE_OK;
  bool io_transaction_result = false;
  bool is_value_in_range = false;
  bool has_to_break = false;
  cc_config_parameter_buffer_t parameter_buffer;

  if (parameter_number==3){
    autoreport_time = new_value->as_uint32;
    ZAF_nvm_write(2, &autoreport_time, 4);
    DPRINTF("cc_configuration_set para no. %d size %d: autoreport_time %d seconds\r\n", (int)parameter_number, (int)size, (int)autoreport_time );
    AppTimerDeepSleepPersistentStart(&cc_multilevel_sensor_autoreport_timer);
    AppTimerDeepSleepPersistentStart(&cc_multilevel_sensor_autoreport_timer, autoreport_time*1000);
  }

    for(uint16_t parameter_ix = 0 ; parameter_ix < configuration_pool->numberOfParameters ; parameter_ix++)
    {
...

}

5. Build and run firmware on BRD2603A to join zwave_soc_multilevel_sensor into PC controller. You can use CONFIGURATION_SET to change auto report period with parameter 3.